Class.
Your "Final" is to take the survey from the link below.
Thank you.
https://www.surveymonkey.com/r/PVYQ9NQ

Tuesday, May 19, 2015
Wednesday, May 13, 2015
Exercise 21 - Design a new App Icon or THMS Baseball TShirt
25 Points


Use the templates on the shared folder to design an app icon or a TShirt for the THMS Baseball team who play on Thursday in playoffs.
Turn in by end of class.


Use the templates on the shared folder to design an app icon or a TShirt for the THMS Baseball team who play on Thursday in playoffs.
Turn in by end of class.
Tuesday, May 12, 2015
Exercise 20 - 1 Day Photo Exercise : Framing Technique
25 Points
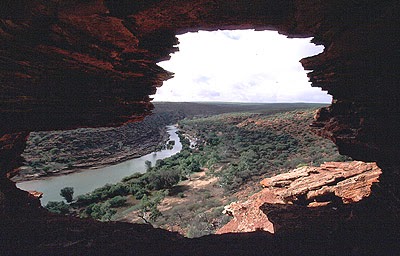


Today you will go out with cameras and take 3 good photos using the Framing Technique. Use the forms of one object to "frame" the view of something in the distance (or closer up). When you come back you will put up your best photo and class will vote.
Walk around and find the desk number then go vote...
Friday, May 8, 2015
Friday May 8 Make a Mother's Day "Something"...


Today Only.
For 25 Points.
Create an image, a collage, a card (if you want to print), an animation...
Take time to remember, forgive, love and honor.
[turn in Mr. Komar Dropbox or do by hand and show teacher]
Thursday, April 30, 2015
Exercise 19 - Motion Tween
100 Points
Due 5/7 if computers work
Motion Tween Animation
Credit: Joe Dockery, CTE Instructor, Mount Si High School, Washington
Motion Tween
In this lesson you will learn how to use Motion tween to move, resize and orient objects to a path. In other words, if your object needs to travel in a curved path, you will want to use Motion tween.
When you finish each file, save it and put it all in a folder to turn in named:
period#_lastname_firstname_19x
12 Animation Principles
- Lesson 1: Motion Bounce (4:13)
- Lesson 2: Hurdles (5:34) *Featuring Motion Paths
- Lesson 3: The Fly (7:20) *Featuring animation cycles and orienting to a motion path
Friday, April 17, 2015
Exercise 18 - More Flash Animations
100 Points
Remember -- there are 3 Animations to put in a Folder to turn in!!!!!
Classic Motion Tween Animation Directions
Credit: Joe Dockery, CTE Instructor, Mount Si High School, Washington
Remember -- there are 3 Animations to put in a Folder to turn in!!!!!
Classic Motion Tween Animation Directions
Credit: Joe Dockery, CTE Instructor, Mount Si High School, Washington
This lesson will introduce you to another type of animation technique in Flash called Classic Tween. Make sure to always use symbols and keep only have one animation per layers. This technique is great for moving in a straight line, resizing and rotating.
In the first activity you will create the basic ball bounce. In the second activity you will create a movie that replicated a game of pong.
When you finish each file, save it and put it all in a folder to turn in named:
Keyboard Shortcuts:
· F5 Insert Frame
· F6 Insert Keyframe
12 Animation Principles (See last lesson, #1)
Anticipation
Tutorials
In the first activity you will create the basic ball bounce. In the second activity you will create a movie that replicated a game of pong.
When you finish each file, save it and put it all in a folder to turn in named:
period#_lastname_firstname_18x
Keyboard Shortcuts:
· F5 Insert Frame
· F6 Insert Keyframe
12 Animation Principles (See last lesson, #1)
Anticipation
Tutorials
- Lesson 1: Classic Tween Ball Bounce (5:08) Example
- Lesson 2: Classic Tween Pong (7:19) Example
- Lesson 2.1: Classic Tween Resize/Rotate (4:18) *Extension of Lesson 2 Example
- Lesson 3: Classic Tween Anticipation (7:00) This lesson features rotate and blur. Example
Exercise 17 - Your First Flash Animation
Animation with Flash
The following lessons and information were provided by Joe Dockery, CTE Teacher and Adobe Education Leader, Mount Si High School.
Step 1. Review the following handout:
12 Animation Principles (pdf)
Step 3:
Turn in both lessons in a folder labeled period#_lastname_firstname_17x
Basic Animation Techniques
Adobe Flash uses four primary animation techniques: Frame-by-frame, Classic Motion Tween, Motion Tween (new), and Shape Tween. In the following lessons you will explore each technique. I encourage you to practice each technique after you complete the tutorial assignment. Make notes on what strengths and weakness that each offers.
Frame by Frame Animation Directions
This lesson will introduce you to a type of frame-by-frame animation. In the first project you will learn how to change the stage dimensions, onion skinning and the animation technique of squash and stretch. In the second lesson you will learn how to create a cycle in the form of symbol.
Keyboard Shortcuts:
· F5 Insert Frame
· F6 Insert Keyframe
Animation Principles
Squash and Stretch
Timing and Spacing
Straight Ahead Action and Pose to Pose - Frame by Frame is the same thing as Pose to Pose. Classic, Motion and Shape tweens are examples of Straight Ahead Action.
TEACHER NOTES: In the video he says to hit "Control + Return" to watch the Flash file play...our systems have an error that prevents ours from working that way. You must publish your SWF file and HTML file to go watch it on your computer.This lesson will introduce you to a type of frame-by-frame animation. In the first project you will learn how to change the stage dimensions, onion skinning and the animation technique of squash and stretch. In the second lesson you will learn how to create a cycle in the form of symbol.
Keyboard Shortcuts:
· F5 Insert Frame
· F6 Insert Keyframe
Animation Principles
Squash and Stretch
Timing and Spacing
Straight Ahead Action and Pose to Pose - Frame by Frame is the same thing as Pose to Pose. Classic, Motion and Shape tweens are examples of Straight Ahead Action.
Tutorials
- Lesson 1: Frame-by-frame Ball Bounce (7:47) *Example
- Lesson 2: Frame-by-frame Flame (5:29) *Example
Also, disregard what he says at the end about turning in your file. You will put both flash files in a folder with the correct name and turn in the folder to Mr. Komar Dropbox like usual.
Monday, April 13, 2015
Exercise 16: Banner ad in Flash (EXTRA CREDIT)
EXTRA CREDIT IF YOU WANT!
DUE 4/23
Save as period#_lastname_firstname_16x

You will now be creating a banner ad from Adobe Flash like the one above. You are allowed to change some of the colors, text and image but show a drawing with the same parts.
Go to the Mr. Komar Shared folder and look for the Classroom in a Book that you have been using and go to Lesson 2
You will learn:
DUE 4/23
Save as period#_lastname_firstname_16x

Class,
You will now be creating a banner ad from Adobe Flash like the one above. You are allowed to change some of the colors, text and image but show a drawing with the same parts.
Go to the Mr. Komar Shared folder and look for the Classroom in a Book that you have been using and go to Lesson 2
You will learn:
1. Drawing Modes
2. Symbols
3. Alignment
4. Deco tool
Wednesday, April 8, 2015
Begin Adobe Flash : Exercise 15 - A Photo Album
100 Points
Due 4/13
period#_lastname_firstname_15x
Today we begin to learn how to use Adobe Flash. There will be an introductory video.
You are going to be making a photo album. You may use the images from the tutorial, photos I took from Maine or your own images you download from the internet.
Use the Flash Classroom in a Book which can be found on your Mr. Komar Shared folder (Flash Lessons). We will start with lesson 1 in the book which will be Exercise 15 for our class.
We will NOT be using the whole book so do not worry. Just to get started....
Today I will present the following concepts:
- The Stage
- Frame vs. Keyframe
- Hidden Tools
When you are finished, submit the Flash file to the Dropbox.
Wednesday, March 25, 2015
Exercise 14 - Design a Logo for U of A Sky School
Due 4/1
50 Points for a Logo
50 Points for a T-Shirt Design (find templates online)
period#_lastname_firstname_14x
Class:
We have received a "request" from a client for a logo and a t-shirt design. You will produce a file that contains both the logo and t-shirt design in the same file. You will need to go to the internet and search for a t-shirt template to use.
Below is a request from a client.
I'm writing from the University of Arizona's Sky School, a new environmental education program based at the Mt. Lemmon summit (check us out at https://skyschool.arizona.edu/). We are hoping to have a t-shirt available for sale during our programs with artwork relevant to our educational programs and the unique Sky Island environment. We're ready to move ahead, and are hoping that one of your classes or some set of students would be interested in contributing some work for a contest. We could provide an astrophotography image from the Mt Lemmon telescopes as a prize for the winner. We're hoping to have something printable by the end of February.
Requirements:
- front side only (back side will be UA Science: Sky School logo)
- black and white only; must reproduce well
- artwork should capture unique aspects of Sky Island environment (example content: mountains, view of Tucson, night sky, native wildlife / plants)
- artwork must be interesting / fun enough that an average 14-18 year old would think it was worth purchasing
- any animals / plants featured must be plausible and reasonably realistic (no thirty foot tall bears fighting a swarm of alligators) but creative placement of wildlife and plants is fine
We've been discussing possible designs... one possibility was a mountain skyline, featuring a student looking through a telescope with a bear nearby. That's just one possibility. We're really open to anything that has a 'wow' factor and is connected to Mt. Lemmon.
Monday, March 23, 2015
Exercise 13 - Choose your own Adventure : Illustrator + Photoshop
Class:

Many illustrations begin in Illustrator and end in Photoshop. Photoshop is the place to add textures, or overlay photos or adjust the colors/contrast/light of an image that can appear flat in vector graphics.
Choose one of the following Tutorials to create a logo that you start in Illustrator and end in Photoshop.
For the fonts, if you cannot get the exact font, at least try to get one that has the same qualities - rounded, serif or sans-serif, straight, etc.


Requirements:
Choose one of the tutorials to follow. Follow the steps and turn in an image by Friday, 3/27
100 Points for completed graphic.
Save As: period#_lastname_firstname_13x.jpg (Save as a JPEG)
Many illustrations begin in Illustrator and end in Photoshop. Photoshop is the place to add textures, or overlay photos or adjust the colors/contrast/light of an image that can appear flat in vector graphics.
Choose one of the following Tutorials to create a logo that you start in Illustrator and end in Photoshop.
For the fonts, if you cannot get the exact font, at least try to get one that has the same qualities - rounded, serif or sans-serif, straight, etc.
Choice A: Instructions Here
Note: For the fonts you can get the main one for free but the smaller font you will need to substitute since it would cost money to purchase. Also, for the "texture" you will want to go to LostandTaken.com and find a free texture that you like. The one the author uses costs money.
Choice B: Instructions Here
Choose one of the tutorials to follow. Follow the steps and turn in an image by Friday, 3/27
100 Points for completed graphic.
Save As: period#_lastname_firstname_13x.jpg (Save as a JPEG)
Sunday, March 1, 2015
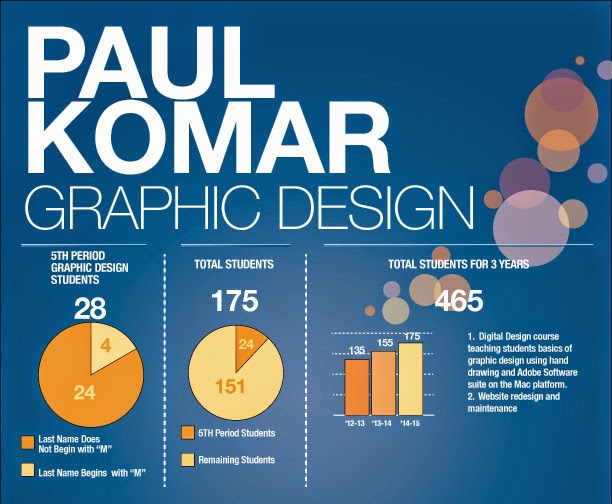
Exercise 12 - Information Graphics Example
Due 3/6

You will be learning how to make "info graphics" in Adobe Illustrator. You will learn from a step-by-step to copy this poster -- however -- if you want to change the text, or other items of information then go ahead.
Go here for the step-by-step.
Save your project as JPEG naming it period#_last_first_12x You have this week to complete.
HERE IS MINE IN PROGRESS...
Thursday, February 19, 2015
Exercise 11 - Garageband loop mix
25 Points
Submit an MP3 15seconds max!
Your teacher will come around and give you 10 points for a cleaned up computer. All files you need in the Documents folder and all files cleaned off of the Desktop/Download folder.
Your teacher will also give you 10 points for updating your "website".
You will experiment with Garageband to make your own 15 second MP3 music.

 Step 1: Open Garageband. Choose any of the projects but I will show you how to do "Hip Hop" choice.
 Step 2: Look at the loops available (highlighted) and you will drag them on to the big black area in the middle. But you have to go to the bottom of the group of tracks listed on the left.
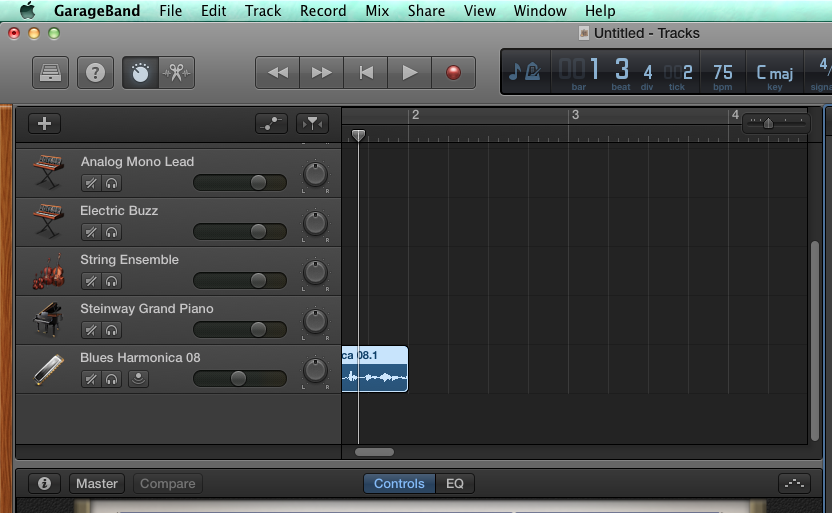
Step 3: See how I dragged a loop over but I had to scroll down on the tracks so that it would work. Now just start layering tracks. Have fun.
 Step 5: Be sure you give it the name of Period#_last_first_11x, choose MP3 as the format and remember where you saved it. Put the MP3 into the Mr. Komar Dropbox.
Submit an MP3 15seconds max!
Your teacher will come around and give you 10 points for a cleaned up computer. All files you need in the Documents folder and all files cleaned off of the Desktop/Download folder.
Your teacher will also give you 10 points for updating your "website".
You will experiment with Garageband to make your own 15 second MP3 music.
Step 3: See how I dragged a loop over but I had to scroll down on the tracks so that it would work. Now just start layering tracks. Have fun.

Wednesday, February 11, 2015
Exercise 10 - Paper Toy Design
100 Points
Due February 17
Class,

Due February 17
 |  |  |
|  | |
Your job is to make a PAPER TOY using Adobe Illustrator (or Photoshop) or a combination.
Here is an example of a good one if you feel like just a box:
Try making a self portrait, or a toy for a niece or nephew, or maybe something for your valentine!
Steps:
1. Find a template you like.
2. Save to your computer.
3. Open template in Illustrator and draw away. Use Photoshop if you want to bring in photos of other creatures.
If you want to make something using this template, here is how
1. Go to http://design.tutsplus.com/articles/design-a-custom-vectortuts-paper-toy-round-2--vector-5069 and see examples and how to fold it up when you are done drawing.
3. Open ZIP file and open the .AI file (the Adobe Illustrator File)
Submit your final paper cutout as a PDF and name it period#_lastname_firstname_10x
Thursday, February 5, 2015
Exercise 9 : Haida / Zuni Tracing
Exercise 9
100 Points
Due 2/11
Native Art – Vector, Geometry and Symbol
In Adobe Illustrator make 2 drawings on one page. Choose one design from each of the following 3 groups and copy it as accurately as possible. For Extra Credit make your own design based on an animal of your choice.
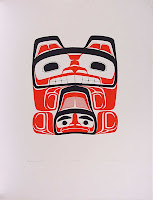
1. Choose a Haida design to copy. Use the pen tool to trace the outlines and close your shapes to fill with color. OR YOU CAN GO LOOK UP HAIDA / TLINGIT DESIGNS ON THE WEB TO PICK YOUR OWN TO COPY.
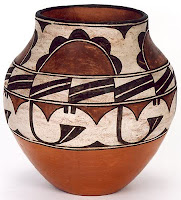
2. Choose a Zuni pot design and try to copy a piece of the pattern and repeat it across the page.
EXTRA CREDIT: Make your own design for the 3RD drawing -- using what ever style you want. If you want to make your own in a Haida influence, or your own rug design, or your own pottery motif -- be creative!
YOU WILL FIND THE ORIGINAL IMAGES TO TRACE IN THE SHARED FOLDER.
Haida / Tlingit Images


Zuni Pottery Designs

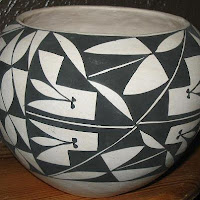
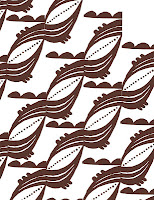
HERE IS AN EXAMPLE OF A STUDENT ZUNI COPY:
Further reading
Haida and Tlingit
http://www.ccthita.org/
http://en.wikipedia.org/wiki/Haida
Zuni
http://www.ashiwi.org/
100 Points
Due 2/11
Native Art – Vector, Geometry and Symbol
In Adobe Illustrator make 2 drawings on one page. Choose one design from each of the following 3 groups and copy it as accurately as possible. For Extra Credit make your own design based on an animal of your choice.
1. Choose a Haida design to copy. Use the pen tool to trace the outlines and close your shapes to fill with color. OR YOU CAN GO LOOK UP HAIDA / TLINGIT DESIGNS ON THE WEB TO PICK YOUR OWN TO COPY.
2. Choose a Zuni pot design and try to copy a piece of the pattern and repeat it across the page.
EXTRA CREDIT: Make your own design for the 3RD drawing -- using what ever style you want. If you want to make your own in a Haida influence, or your own rug design, or your own pottery motif -- be creative!
YOU WILL FIND THE ORIGINAL IMAGES TO TRACE IN THE SHARED FOLDER.
Haida / Tlingit Images


HERE IS AN EXAMPLE OF A STUDENT ZUNI COPY:

Further reading
Haida and Tlingit
http://www.ccthita.org/
http://en.wikipedia.org/wiki/Haida
Zuni
http://www.ashiwi.org/
Exercise 8 - Return to Illustrator : Video Game for Pen Tool Practice
We are going to return to Adobe Illustrator.
To prepare for some of the upcoming exercises. Let us review how to use the Pen tool in Illustrator.
First, go make a landscape (you did this before) and then go try to save Weber!
2 Parts:
Part 1 -
25 Points
Redo "Landscape" Tutorial (remember this one?)
Show the final picture to Teacher for 25 Points
 |
Exercise 1: Land
25 Points
Due End of Class (2/3 - per. 2, 4 and 2/4 - per. 1, 5, 7)
Show the Teacher you completed for 25 Points.

Sunday, January 25, 2015
Exercise 7 - Compare 2 "objects" and present to the class
100 Points
Due Friday, 1/30
Class


Due Friday, 1/30
Class
- You will present to the class a 1 minute comparison of 2 “subjects” – something that is interesting to you. Some kind of hobby, place, dream, or event. I will project your 2 pages for all to see.
- Use Adobe InDesign to create a 2 page document.
- Each page will contain an image, text, a title and a box with color.
- The items must overlap in some way.
- You must make the images on the pages link to somewhere on the internet (in this presentation)
- Both pages must have at least 5 pieces of information about that image.
Here are some examples of what you could choose to compare: video games, dance styles, foreign cities, music videos, architectural buildings, novels, cars, trucks, low rider bicycles, shoes, etc.
I compared 2 ways to go up and down the Grand Canyon...
Make yours even more personal and by all means play around with the layers and objects to even make more of a collage of images.
The instructions and my interactive PDF are on the Mr. Komar Shared Folder.
Thursday, January 22, 2015
Exercise 6 - Sporting Event Ticket
Due 1/27
100 Points


Background
For this lesson you assemble two master pages and two page spread. The end product in this project is a pair of sample tickets, one for basketball and one for a motocross event. They are the same in layout and style. Only the event information, color and background image differ. A strategic use of master pages eliminates all duplication of effort.
If you want 5 points extra credit – make one or both of the tickets for your own event.

If you want 10 points extra credit - make a ticket design for Superbowl XLIX
If you want 20 points extra credit - make a ticket design for Superbowl XLIX using Adobe Illustrator and come up with your own image design
Remember! For all assignments, do not turn in the original file. Save as a PDF so that it can be printed. (If you use Illustrator, Save as a JPEG so that it is one big image.)
Thursday, January 15, 2015
Exercise 5 - Project Proposal
Due 1/20
BACKGROUND
For this InDesign lesson you will assemble a 4-page. black-and-white publication. This project proposal presents an architect's plan for the development of a community facility within the coast town of Bella Coola. Located in British Columbia the western-most province of Canada, Bella Coola is named for the people who have in habited the region for uncounted generations. To establish a base for this multipage publication, you will assemble a master page. Once assembled, this master page will make it possible to place text and graphics elements, column guides, and page-number markers (for automatic page numbering on every page within the proposal publication automatically. In this exercise, you will begin assembling by setting up the document, including guides, margins, columns, and layers.
You will find the instructions and files to insert in the Mr. Komar Shared folder under "05 Project Proposal"
Here is how the final publication will appear:
 |  |
 |  |
Monday, January 12, 2015
Exercise 4 - A Tri Fold Brochure
Due: 1/15
REMEMBER! YOU MUST TURN IN A PDF -- Not the Adobe InDesign file. Go to File > Export and choose Adobe PDF (print version) in the "file type" box.
100 Points
The Eagle Creek Animal Clinic needs a new brochure. In this exercise, you will begin creating it for them by setting up the document, including guides, margins, columns, and layers. You'll create a shaded background on part of the brochure, and import content from provided folder.
HERE IS THE FINISHED BROCHURE:
 page 1
 page 2
The Eagle Creek Animal Clinic needs a new brochure. In this exercise, you will begin creating it for them by setting up the document, including guides, margins, columns, and layers. You'll create a shaded background on part of the brochure, and import content from provided folder.
HERE IS THE FINISHED BROCHURE:
page 1page 2
You will find the supporting documents in the Mr. Komar Shared folder under Exercise 04 - Brochure.
REMEMBER! YOU MUST TURN IN A PDF -- Not the Adobe InDesign file. Go to File > Export and choose Adobe PDF (print version) in the "file type" box.
Save the file as period#_lastname_firstname_4x.pdf to the dropbox.
Tuesday, January 6, 2015
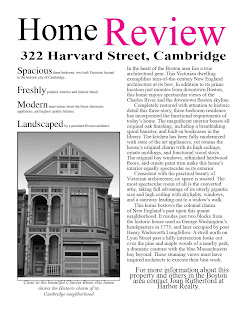
Exercise 3 -- InDesign: A Flyer
Due: 1/13
100 Points
100 Points

Harbor Reality needs a new flyer. In this exercise, you will begin creating it for them by setting up the document, including guides, margins, columns, and organized in appropriate layers. You'll learn about the Paragraph Formatting Control palette and create a Drop Shadow, and center text.
Your project content and directions can be found in the Mr. Komar Shared folder under Exercise 3 - Flyer.
When you are done, save the file as period#_lastname_firstname_3x.indd and put into Mr. Komar Dropbox.
Sunday, January 4, 2015
Welcome to Semester 2 -- Desktop Publishing with Adobe InDesign
Welcome back class...
Thank you for returning and I hope we have a creative and productive semester together!
We are going to learn how to do Desktop Publishing with a tool called InDesign. You will need to go into applications and look for this icon.

1. Introduction video about InDesign. Click here to watch as well.
2. Go look for a logo of a company you want to work for (even if pretend). Have the logo up on your screen for everyone to see. Hold Control and click on the icon to save to your Download folder.
3. Let Mr. Komar take over to show you some important terms and definitions for using Adobe InDesign.
4. Make a Letterhead. Go to the Shared Folder and open the folder 01 Indesign Letterhead. You will find the instructions and parts you need to begin.

5.Save the file as
period#_lastname_firstname_1x.indd
Letterhead Project: 50 Points
Due: 1/7/2015

Due 1/7 : Exercise 2 - A Music Concert Poster
The "poster" has been a graphic form to announce, inform, advertise, entice and generally set a tone for an event. You are going to follow the instructions in the Mr. Komar shared folder to make a poster like the one above.
You will have a chance to be creative by choosing what bands you want to appear at this "concert".
However, you will make it look just like the one above.
Later we will be more creative and open up the design but this exercise is to learn more about InDesign.
You will learn:
Save the file as
Thank you for returning and I hope we have a creative and productive semester together!
We are going to learn how to do Desktop Publishing with a tool called InDesign. You will need to go into applications and look for this icon.
1. Introduction video about InDesign. Click here to watch as well.
2. Go look for a logo of a company you want to work for (even if pretend). Have the logo up on your screen for everyone to see. Hold Control and click on the icon to save to your Download folder.
3. Let Mr. Komar take over to show you some important terms and definitions for using Adobe InDesign.
4. Make a Letterhead. Go to the Shared Folder and open the folder 01 Indesign Letterhead. You will find the instructions and parts you need to begin.
5.Save the file as
period#_lastname_firstname_1x.indd
Letterhead Project: 50 Points
Due: 1/7/2015
AFTER 45 MINUTES ON LESSON 1 - BEGIN LESSON 2

Due 1/7 : Exercise 2 - A Music Concert Poster
100 Points
The "poster" has been a graphic form to announce, inform, advertise, entice and generally set a tone for an event. You are going to follow the instructions in the Mr. Komar shared folder to make a poster like the one above.
You will have a chance to be creative by choosing what bands you want to appear at this "concert".
However, you will make it look just like the one above.
Later we will be more creative and open up the design but this exercise is to learn more about InDesign.
You will learn:
1. How to use the ruler
2. How to use guides
3. Polygon shapes
4. Centering text
5. Changing font type
6. Coloring shapes
Save the file as
period#_lastname_firstname_2x.indd
Subscribe to:
Comments (Atom)